Tuesday, January 24, 2012

Chickasaw Fort WIP 3

The fort or palisade or whatever you want to call it is moving toward it's terminal phases.

I started by painting the palings Ceramcoat brown-gray and then washing them with Ceramcoat Walnut.  That made them look pretty weathered, maybe a little too weathered, and also gave the color just a little more depth.  I also used the Walnut wash over the built up areas to provide some shading to the earthen areas.


 After that it was patiently putting down the Woodland Scenics turf.  It's really tempting to rush through this, but that just creates holes in your work.  I use a big brush to apply Woodland Scenics cement and then just scatter it over the glue and try to recover whatever is left over.  Then I let it sit for 15 minutes before moving on to the next area.  When it's all applied, I Dullcoat it to more effectively hold it in place.

 Next, it's on to the finishing landscape pieces.

Sunday, January 22, 2012

SNOW DAY!! The Revenge

Snow days are always a mixture of elation and frustration for me.  As a teacher, I know these are days I'll need to make up in June.  They're not freebies off with pay.  Unlike my wife, I can't work them off from home.  They have some real consequences for me.  The first snow day of the year is made up on the Friday before Memorial Day weekend.  That's the first day of Enfilade.  No snow days means I can easily make the Friday sessions.  Snow days mean I have to leave from school at 2:30 and fight traffic down to Olympia.  Bleah.

 The snow days of this week, however, had a new set of challenges.  We knew the Wednesday snow fall was going to be big.  Just how big wasn't clear.  I thought I'd be out of school Wednesday and Thursday and back to work on Friday.  I envisioned lots of painting and finishing the Chickasaw palisade.  It certainly started out that way.

 Wednesday we got the snow.  Thursday morning we got freezing rain.  Dum, dum, dum.  In an area with lots of trees and above ground electrical wires, freezing rain is the weather equivalent of nuclear war.

At 9:00 we heard from my son a few miles away, he'd lost power.  At 11:00 I walked out to the arterial near our development to check on road conditions, came home to figure out how to best de-ice our frozen cars, walked in the door and we lost our power.  It was out for nearly 60 hours, coming on last night at 8:00ish.

As with all disasters, the first thing you have to do is assess your resources.  We knew we'd have light for a while-good.  We also had an electric lantern-rechargeable variety-so light-for a while.  We had plenty of food.  A few years ago we installed a gas fireplace in the living room and a small standing gas fireplace in the bedroom for just these occasions.  We wouldn't freeze or be forced to leave the house with our ridiculous dogs.No entertainment to speak of, but I did have a battery powered radio that could also be hand cranked and lots of batteries. I had my Kindle, with a nice back light, so I could read in the dark until . . .A couple of working flashlights and Lorri is the candle queen.

We also checked our problems.  The fireplaces would keep our bedroom warm if we closed the door, but the electric blower in the living room was off so the immediate effect of the living room fireplace was to camp us right in front of it.  No computer, limited light, no television.     Phones are all-electric, so no phones.  Cell phone service went down with the nearby cell towers, so service was terrible. Text messaging was okay, but no internet, e-mail, or calls from my iPhone.

 Bottom line, we were prepared for a short power outage, the kind we always have, say 24-36 hours.  We survived Thursday and Friday just fine.  It still got chilly in the house unless in the bedroom or sitting by the fireplace. There was never enough light paint by, and one can only listen to so much radio.  The lantern died after about 12 hours and no way to recharge.  We didn't complain, however.  We drove all around, to charge our phones, and could see the outage was massive.  18,000 customers in Puyallup lost power; 280,000 in the Puget Sound area were out-we'd get by. 

Thursday we checked on family, and drove to survey the extent of the outage.  We went to the movies and saw We Bought a Zoo and I liked it. Cameron Crowe movie with Matt Damon, what's not to like.  This was easy.

 Friday I drove around and surveyed the extent of the damage.  Weyerhaeuser, Lorri's employer, lost power, so I drove her around in search of fabric stores.  No luck, all closed.  Came home.  No power.  The lantern died.  I finished building the Chickasaw fort by firelight. Not fun. A last drive on Friday night to recharge the cell phones showed a little progress in repairing the power.  We were optimistic.

 By Saturday morning, it was clear the repairs were fully underway.  The neighborhoods with power were creeping closer to us.  We had an errand to run to Issaquah, forty miles away, and were confident when we returned we too would have power.  My son Pat got his power back within six hours of his outage.  My mother in law had hers back within eighteen hours, and my brother-in-law Paul had his back early Saturday morning. Our errand, to pick up forty pounds of chicken, which would go in our freezer, required power.

When we returned home at 4:00 to no power it was devastating. (We ran the meat over to my vegan son and daughter in law's freezer.  They must have been so pleased.) I was looking forward to who know's how much longer of time wasted-no heat, no light, no painting gah!  Lorri went out with a friend at 6:00 and sent me a text that some houses in our development-"Fuck those guys, I want power." I sent off several Facebook posts reporting similar, if somewhat more G rated views. My brother-in-law dropped off a working lantern, some hot water for coffee and tea.  Ingrate that I am, I continued reading my Kindle by firelight and finished my Diet Coke, but I did truly appreciate the effort. Finally at 8:30 the power came on to cheers and hosannas. 

I know we're fortunate.  It could have been worse and for many folks out there that live on isolated lots or small communities, it will be.  Puget Sound Energy always focuses on the biggest bang for their buck first-bring on as many customers at one time as possible.  Some time mid-week they'll have their power back on.
Top view of completed fort.  I used wood putty around the base of the palings and created some slight ground irregularities.

A comparison with figure size.  The minis are OG Woodland indians.

Another shot with Indians from a different angle.  Seems weird to have Indians defending a frontier fortification.

The beginnings of landscaping.  I painted the green areas with an artist's acrylic.  I just can't make Ceramcoat's Forest Green cover anything so I'm using Artist's Advantage Hooker Green from Fred Meyer.  It works.

Another aerial shot.
 So my snow days are gone, and it's time to move on.  I've included a couple of photos of the few things I was able to get done.  The Chickasaw fort is still in progress.  The palings are all in, and now I'm beginning to landscape.
One can't have too many trees, and I have a bajillion armatures for fairly smallish trees and the clump foliage to stick on 'em.  They'll be mounted on washers to weigh the little darlin's down.

I started working on trees from Woodland Scenics.  I have a lot of the smaller armatures, and I want to be sure I have plenty for the Chickasaw game.  I'm weighting them with 5/16" washers flat cut washers so I can use them individually.  I probably have about 60 or so armatures, so I've got a lot of work to do.

Thursday, January 19, 2012

SNOW DAY!! The Sequel

We here on Puyallup's South Hill didn't get pounded as many other communities did yesterday:  Centralia and Olympia each had over a foot of snow.  However we did get five inches.  Fortunately, or unfortunately depending on your point of view, the snow turned to freezing rain and rain by noon.  When I discovered the lovely snow was snow no longer, got serious and painted away on Wayne's Legion figures and continuing work on the Chicasaw Fort.

 I was shocked when the school district announced a closure for today at about 5:00 PM.  So I'll have a chance to do even more work on the fort and the minis.  It's a good thing.

Wednesday, January 18, 2012

The Indian Stockade: WIP

It's great, I'm here at school on deadline on a Friday night, desperately hoping I'll get home in time to see the season premier of Portlandia.  Some things are more important than others. In between looking at stories, and page designs I decided to amuse myself by working on my next terrain project, the Chickasaw stockade.

As you can see from the illustration, the Chickasaw stockade is not huge, and is nothing like we see on the whites building on the frontier.  No bastions, firing platforms or interior buildings. In an Indian palisade, the palings simply are not flush together.  A gap is left between the timbers to allow fire. There's not a gate; entering and exiting  is done by a narrow opening.  My objective is to provide a simple fortification warriors can use to defend their village and food source, or send their families for safety.  And I want to scratch build it.

There is a commercial Indian palisade available from Acheson Creations. It's not even terribly expensive, and looks pretty nice, but I've decided to make it myself. 

I decided on dimensions of 12" X 6" with rounded corners.  I decided to make the palings two inches tall from 1/8" craft dowels I bought at Michaels.

Step One:  I cut the dowels on my little scroll saw, shattering a few along the way.  My bad.  After cutting the dowels into two inch lengths. I traced out the outline of the palisade. 
The dowels are sanded to flatten one end and an irregular peaked shape is created on the the other end

A hole is drilled in the flat end and a hunk of .032" brass wire is glued into the hole
 Step Two: I decided the best way to fix the palings into the plywood was to put a pin into them and glue them into the holes.  I sanded one end down flat and tried to remember to round off the top edge or to make a point; I didn't want them to appear too uniform.  I started by using a pin vise to drill the hole because I was afraid using a drill might split the dowel.  After taking forever and wearing out my hand, I switched over to my Dremel tool and it worked fine. I chose .032" brass wire for the pins and I began cutting it to length.  Actually, to make it easy, I inserted the brass rod into the hole and cut the protruding rod to the desired length, and glued it in with CA glue.

I started gluing the palings into the holes in the plywood and immediately discovered I'd need to skip some of the holes if the palings were to have enough room and leave sufficient gaps. 
One view of the Chickasaw fort under construction.  The palisade doesn't have a gate.  The entrance is open but protected by fire from the overlapping curved wall.

The palings don't fit flush and provide some fire openings between palings, yet offer some protection to defenders including women and children seeking shelter from an attacker.  The holes for the palings are clearly visible.
The brass wire offers some advantage.  It fits snugly in the holes, and can be bent a bit to get the palings perpendicular.

A cornfield wrap up

A frontal look, on my dining room table, of cornfield with 28mm infantry and a Hovels log cabin in background.

More of a top view.  The cornfield is 10 bases X 5 bases, 40mm square.

Another comparison shot of the cornfields with 28mm Mexican Presidial cavalry
I've made all the cornfields I have bases for, but would still like to make more.  I may even resort to something other 40mm square. Or I could just buy more, but I'm getting cheap in my old age.   I feel good about these. 

I actually have a bit more bases than I've shown.  Total of 64 bases.  The cornfield pictured is 15" X 7 1/2 "

SNOW DAY!!

It's snowing.  It's snowing a lot.  It's 6:39 AM, been snowing for hours.  We've been flirting with snow stuff for days, but it's really coming down, enough so the Puyallup School District announced today's closure at 5:30 last night. So, while Snowpocalypse 2012 roils on, I am going to be painting and working on my Chickasaw stockade.  I hope to have a few new posts too.  Will put some pictures up of today's winter wonderland when it is light enough.

Friday, January 06, 2012

Chickasaw Bluffs: an outline

I've been trying to put together my plans for Chickasaw Bluffs as part of my Enfilade projects.  I'm thinking seriously about what I want the game to look like.  It might be complicated but should be fun.  So here it is in a nutshell.
The Layout
There are two 8' X 5' game tables separated by space to move between them.  The left table is an all land table, at relatively equal elevation.  The terrain will consist of an Indian village represented by four or five small buildings and a defensive stockade, plus a large cornfield. The rest of the terrain will be some medium sized hills and a fair number of trees.
Yes, it's crude, but I'm thinking the board will look something like this. 

The right table is partly river, with a with an irregular shoreline roughly bisecting the table lengthwise. The shoreline rises quickly to an impassable height with a steep, but passable grade near the board edge.  At the top of the hill is a Spanish battery defended by an earthwork.    At the top of the table is a Spanish encampment.

 The Forces
American Forces: The Americans will have a combination of regular and militia troops.  There are six American units (half companies) of 12 figures each.  In addition there are eight militia units (half companies) of 10 figures each.  To support the foot forces will be at least one (perhaps two) mounted militia companies of ten figures each, and an artillery detachment two-three guns (there will be choices to make.)  Last, but not least, the Americans will have a keelboat and four armed pirogues.  The priogues can each carry a half company (one unit.)  The keelboat can carry a complete company (two units)

Spanish Forces: The Spanish will also have a combination of regular and frontier militia (cuera) troops.  There are two half companies of Spanish regulars, 10 figures each.  The three militia half companies are also of ten figures each.  One of the Cuera companies may also mount as lancers.  Finally, the Spaniards will also have three artillery crews.  They will be able to apply these to the three pounders in their camp, or the twelve-pounders in their earthwork.

Indian Forces: The Indians, Chickasaw warriors, will defend their homes with eight ten man units, all dismounted.

The Scenario  

A combined army of American regulars and militia are making their way down the Mississippi to capture New Orleans.  The Spanish are fortifying the west bank of the Mississippi and providing anchorages for river galleys in order to control Mississippi traffic.  The Americans force is intended to capture  the Spanish battery commanding the river from the bluffs.  

The Spanish have paid the Chickasaw (and other tribes) to fight the Americans, who menace their homelands.  The Chickasaw also provide some much needed to manpower to augment the small and dispersed Spanish Army in America.  

Particulars
The American forces are divided between a force marching overland toward the Chickasaw village, and an amphibious force aimed at ascending the bluffs from the river .  The Indians may begin in the cornfield or the stockade to defend their village.  The Spanish begin in their encampment, ready to move, having been given the alarm by their Chickasaw allies. 

Units can move freely between the two tables, being separated only by convenience.  I'd be interested to hear, dear readers, what you think. 

Friday, December 30, 2011

2011 in review and a look ahead

2011 was, by any measure, a great year for miniature wargaming at my house.  I reviewed my 2010 plans and promises and found that I didn't necessarily stick to them.  The biggest promise being-NO NEW PROJECTS-yet the new projects I did take on were inexpensive or are largely finished. I did manage to paint nearly 600 figures this year, including cogs, 28mm figures and 15mm figures.  So from that standpoint it was a good year.

For the most part, the year focused on four major painting projects.  The first was getting ready for Hobkirk's Hill.  I finished all the figures necessary for this and ran the game successfully at Enfilade.  Hobkirk's Hill is important because it is an integral part of my overall AWI goal: be able to run all five battles from Nathaniel Greene's campaign in North and South Carolina:  Cowpens, Weitzel's Mill, Guilford Courthouse, Hobkirk's Hill, and Eutaw Springs (yes, I'm leaving out the siege of Ninety Six, but that would spare me the embarrassment of  having to build a fort under attack by men carrying large hooks.) I don't expect this will be a year in which I paint many AWI figures, but I do have a couple ready to paint, and I could see myself painting Von Bose or the 23rd Regt.
AWI Hobkirk's Hill was just a step toward completion of my AWI project
The second project I took on was of limited duration and that was the cog-building project for Sluys.  I am most proud of this work.  From using David Manley's rules, to thinking through and building the ships, playtesting and running the actual game, I still believe it was about the best thing I've ever done.  It was a fun game built on a very limited budget.  It looked good and folks had a good time. I'd actually like to build a few more cogs and galleys and try to game with individual ships.  Not quite sure when that would happen.
My first cog-with the fighting castles reversed.  I have ten more just like it. Doh!

My first batch of completed English ships

The cog Thomas, leads the English fleet

The giant hand watches over the first Sluys playtest.
 The third project was kind of a "you must do this" activity and that was painting and mounting my 15mm Jacobite Wars figures for the Killiecrankie campaign.  I'm ready to go, but I haven't gotten them out of the box since.  Something needs to change with the latter, and I'll speak to this issue more.
Hallmark Highlanders

Lord Leven's Regiment.

 Last, but not least, is my Mississippi project.  This one, unfortunately, threatens to be a monster.  At the present time I have almost all the miniatures necessary to run my first campaign, the assault on Chickasaw Bluffs on the Yazoo River in 1797 and an assault on New Orleans.  Sounds like I know what I'm talking about, but it's all hypothetical.  I'm busy painting away as we speak.  But I also want to broaden this to a confrontation between more regular Spanish and American troops over the Louisiana Purchase boundaries after 1803.  This would require considerably more Spanish troops and more regular U.S. Dragoons than I currently own.  I think this latter hypothetical look at Spanish American relations may end up a phase two that will be built later.

So, looking ahead to 2012, I see myself working in a couple of areas.  First is the Mississippi project.  Not really that many figures to paint.  There are lots of Indians in the scenario, but I already have these painted.  I need eight 10-figure units of U.S. militia, and I believe I have most of these already.  If I paint my Christmas bounty (36 militia from Perry) and do some fiddling and a little bit of remounting that won't be a problem.  I also have 30 Wayne's Legion figures to paint, which will give me six 12-figure units of U.S. regulars.  More daunting to this is creating the terrain pieces.  The cornfields are nearly done, but there is the stockade and the bluffs themselves.  I haven't quite figured it out, but that's all part of the project.

The second project I want to progress is my War of 1812 stuff.  I am only interested the Chesapeake actions, particularly Bladensburg.  I have my tons o' Victrix plastic figures to build and paint, and I anticipate getting started after Enfilade, but all goes well with Chickasaw Bluffs, it may be earlier.  There are British regulars to paint, militia to buy and paint.  You name it.  In any case I'll keep you posted.

I plan to stick to my NO NEW PROJECTS pledge.  I have plenty of figures to paint and want to advance my old ones.  There are a couple of anniversaries in mind.  There is the 200th anniversary of the Niagara campaign and the Battle of Bladensburg in 2014 to prepare for.  The year after that is the 600th anniversary of Agincourt, so working on 1812 and Hundred Years War figures would seem to be the right thing to do in advance of the celebrations I see happening at Enfilade.

If I have one promise I'd like to keep, it is to get out and game more.  Miniature games, board games, hanging out with my gaming buddies more would be my my big new year's resolution.  I have stacks of painting figures that rarely see the light of day, and I need to do better.

Wednesday, December 28, 2011

DANG! I forgot my camera

Yesterday was the eleventh installment of Dave's Annual Naval Game or DANG, and I was once again in attendance.  Unfortunately, my camera was not, so I strongly urge you to take a look at whatever pictures Dave uploads to his blog, the excellent Naval Gazing in my featured blogs list.

 This year all the Civil War naval gamers have rallied around the release of Sail and Steam Navies, so it was only fitting that this year's DANG featured a SSN game. Dave created a mini-campaign on a river.  Each side had a points limit to choose from and create their riverine flotilla based on the points value of the ships available to them.  The Confederates had an iron-clad a-building at the head of the river. The Yankees's job was to brave the obstacles in their path and destroy the ironclad before it became a menace to Union control of the Mississippi.
Our beloved flagship, the barge, er scow, um ship Tuscumbia.
 I was a Union player and we had to make some decisions about the ships to acquire to dispute the control of western waters with our rebel counterparts. We ultimately decided on the Tuscumbia, an ugly ironclad scow, mounting three of the prettiest 11-inch Dahlgren smoothbores available.  We provided the ironclad Essex, timberclad gunboat Lexington, a pair of sternwheel tinclads, and the ram Monarch as escorts.  Together with unarmed transports and barges carrying troops and fuel we headed up the mighty Carnot River.

 We encountered numerous earthwork gun batteries along the way.  But all were dispatched fairly easily, except for the fifth and last one that inflicted a critical hit on the Essex, forcing us to withdraw and make repairs, and leaving us behind schedule.

There were also two surface actions, both occurring at night.  The Confederates attacked the anchored Union fleet with three spar torpedo boats.  Our deployment was fairly ineffective in terms of offering support so George Kettler quickly found his two tinclads horrifically exposed as the gnat-like Johnnies swept on to the table.  Though the tinclads found the range, they couldn't convert their hits into damage, and the Naumkeag was sunk by a spar torpedo.  A second torpedo boat seriously damaged the Lexington's paddle wheel forcing us to tow the vessel upstream.  The Confederates didn't get off scott free as they mostly expended their supply of spar torpedoes and the Lexington's tormentor managed to blow himself up in the attack.

The second night battle was, of course, the last turn of the campaign.  Weathering a host of delays and distractions, the Confederates gave battle before the Yankees reached the ironclad Missouri's birthplace, but just after it had a major engine failure. The pride of the Carnot River Defense Fleet was hauled into action by a tugboat.  Alongside the Missouri were the rams Gen. Beauregard and Gen. Bragg, as well as the last armed torpedo boat.
The General Bragg, captured at Memphis, eventually became the USS General Bragg.
The Rebs had a bit of an advantage, heading downstream, and we, again were faced with being anchored heading upstream. The Rattler, George's other tinclad, was the first casualty, rammed by the Beauregard.  Beauregard and Bragg both took a pounding from the two Union ironclads.  Missouri was towed toward the center of the board with it's unpleasant three gun battery.  My Monarch was the fastest of the Union vessels, and with no guns to fire, set out to use its chief weapon, its ram, against the slow and unmaneuverable Missouri. Braving two turns of fire, suffering little damage, Monarch skewered Missouri dead amidships, and that was pretty much all she wrote for the southerners.  The wooden rams were more or less intact though the torpedo boat was resting comfortably at the bottom of the river.
A famous engraving of the Monarch ramming the Beauregard.  Imagine an almost immobile ironclad gunboat in the place of the Beauregard and that's what happened in our game. Me! Me! I did that! Yes!
It was a great game and a lot of fun as usual.  I was on the winning side, which is rare for me, so that was nice too.  Great guys playing as always: David Sullivan, Mark Waddington, Arthur Brookings. Dave Creager, Dale Mickel, Scott Murphy, and George Kettler.  Great miniatures from George and David joined my sorry lot (Of course, you can't see them because I'm a dope.)  Daveshoe and Lynnshoe provided the eats and took the pics.  It was awesome.  

 This is my third game of Sail and Steam Navies.  There are many things I really like about these rules.  The firing charts are pretty easy to use, but it is not easy to convert hits to actual damage.  In doing this, the creators have really made SSN a rammer's game.  With the two movement phases, it's pretty easy for a fast ram to pickle his victim and not even be fired on.  I don't think it should be this way.  I'm hoping we can maybe make some house rules or get some clarifications that iron out some of these issues.

Sunday, December 25, 2011

Merry Christmas to all

It's early, and soon the family will descend on our little house for Christmas brunch and exchanging gifts.  For me, the best part of Christmas is seeing family.  Since my youngest son, Casey, moved to Seattle, I confess to suffering from a certain amount of kid withdrawal.  I love my boys, and there are times when I just wish we could be together.  They're smart and fun, and spending time with the two of them is the best time in the world.  I'm looking forward to seeing them today.

 Yes, just in case you were wondering, Lorri, er, Santa did bring me gaming goodies. I landed 36 figures from the Perry AWI southern militia range.  I love these figures.  They're simple but interesting and will serve well in my Mississippi project as militia.

I also received a couple of Osprey books.  First, I got the newly released Men At Arms book on the Spanish Army in North America 1700-1793.  The timing for this couldn't be better, and I'm beginning to have second thoughts about how I've organized my Spanish toops (in my mind and my figure collection.)

I also got the new campaign book on the Battle of the Wabash.  Also known as St. Clair's Defeat, or St. Clair's Disaster, this horrendous Indian battle north of the Ohio River in 1791 led to the formation of the American Legion under Anthony Wayne and the decisive battle of Fallen Timbers in 1794.  I've been poking through Wabash by John F. Winkler, and I think it has a lot to offer.  It is a topic not well covered by easily available books.

 I hope you've had a happy holiday and the opportunity to hang out with your families.  To all of you who read this blog, in Canada and Australia, Ireland and Great Britain, in Europe, Asia and the United States, the best Christmas to all, and the happiest of new years.

Saturday, December 24, 2011

Cavalcade French and Indian War Review

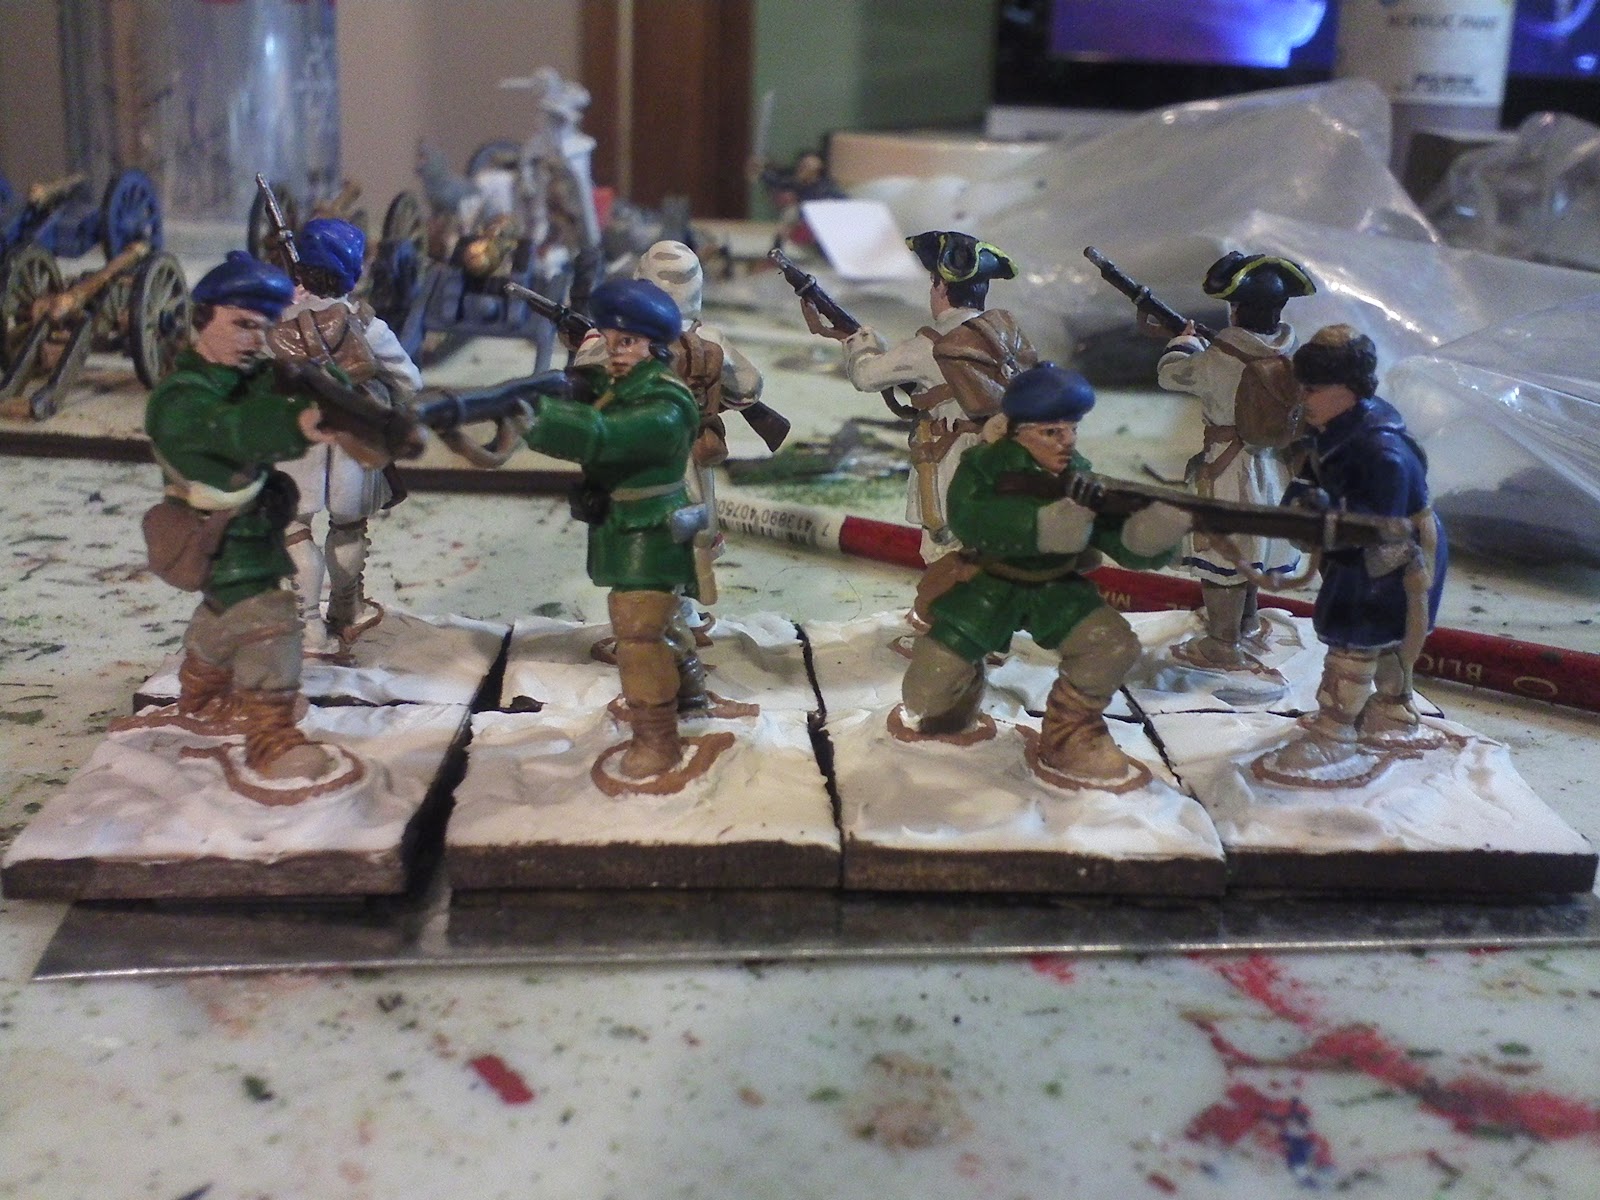
I painted some of the Cavalcade French and Indian War figures for my friend David for Christmas.  Dave has always been interested in the conflict and has read extensively about Robert Rogers.  When Cavalcade released a range of French and Rogers Rangers in winter dress, wearing snowshoes, I thought they'd make a great gift. 

 David plays FIW games in skirmish 1:1 scale, so picking up a pack each of the French and Rangers was fine. I picked up the rangers firing and the French marching.  The figures are large and bulky, the latter due mostly because of their winter clothing. There was some flash on the castings, particularly on the French between the musket and body, but I did my best to clean them up. 

 I primed them and mounted them on one inch square Litko bases. This takes some doing because of the size of their metal bases, necessary due to the snowshoes.  I started with the French.  Generally the figures are well cast, and anatomically consistent.  They are larger than OG or Perry, but not as chunky as Front Rank.

I started painting the French first.  The detail is uneven.  The muskets are almost delicate, but some of the musket stocks and musket detail is crude.  The hands aren't great either.  The figures are well accoutered with cartridge box and haversack, but the belts and straps seem to disappear as they head from the back, over the shoulder and down the front of the figure behind the hands and arms.  Two of the figures wore standard uniforms, and two wore blanket coats.   I liked the way they painted up.

 Then I turned to the Rogers Rangers.  I enjoyed painting these more than the French.  Same complaints with the muskets.  Three of the four miniatures wore mittens, which I thought was a nice touch.  There were several different versions of leggings, which was nice.  The figure in the blanket coat I particularly liked. I thought the cuff detail was clunky, and could have been a bit cleaner.

All in all I would rate the Cavalcade figures 4 points out of 5. Some of the  detail issues are offset by the uniqueness of the miniatures and I could see ordering a some figures for myself.

More Cornfields and Gunners

On TMP yesterday, Bill Stewart correctly reminded me it would be a good idea to photo figures alongside the cornfields in order to get an idea of relative size.  I've positioned some Old Glory Wayne's Legion figures right up against the cornfield stands.  Cut at 1 1/2", the cornstalks are just about the exact height I was looking for, being slightly more than head high.

 I'm also sharing the finished guns and gunners I finished during the week.  First up are the American guns and gunners by the Perry Brothers.  The first gun crew is in the firing position.  The second gun crew is in the aiming position.  Nice figures, easy to paint.  Typical Perry stuff.  I've already complained about the guns, so I won't re-run that.
Perry gunners aiming their six pounder

Perry gunners firing
 I also photographed the RSM Spanish guns and gunners.  The first gun is a 3pdr.  The second gun is a 12 pdr.  The Spanish adopted the Gribeauval system, and either painted their guns a light blue, or left them a natural wood and varnished them.  Given the American guns were blue-gray, I thought I'd go with the natural finish for the Spaniards. I like the gunners-a little clunkier than the Perry gunners, but very adequate. 
RSM Spanish artillery with 12pdr
Spanish artillery with 3pdr.

Friday, December 23, 2011

Cornfields: WIP


"This place far excels in beauty any in the western country, and believed equalled by none in the Atlantic States.  Here are vegetables of every kind in abundance, and we have marched four or five miles in cornfields down the Oglaize, and there is not less than one thousand acres of corn around the town.(sic) "

 Lt. John Bowyer described these conditions at the Miami town of Auglaize on the march to Fallen Timbers in 1794.  The luxuriant cornfields he observed were typical of most large woodland Indian settlements encountered during campaigns on the frontier in the late 18th century. Maize in the fields were resource targets for Americans fighting those Indians.  General John Sullivan devastated the Iroquois in his summer campaign of 1779, burning thousands of acres of corn and forcing elements of the Six Nations across the Niagara and upon the kindnesses of the British for sustenance.

I decided that if I was going to do a hypothetical campaign on the Western frontier in the 1790's, I needed a big bunch of cornfields.  I didn't want to build just a big ol' cornfield to just plop down on the table and then store with difficulty.  Rather I wanted something I could morph into different shapes or scatter around, and remove bits of as it was destroyed.  I'd seen the very cool cornfields from BTC and reasoned I could make something like that for myself  at a more affordable price.

 I started with Litko bases.  I ordered fifty  40mm square bases.  These are heavy enough to hold the "corn" and not move around on the table top. $6.99, plus the ridiculous Litko shipping fee.  I also ordered ten packs of 12mm pine stems from This and That 4 Crafts.  Those are holiday craft items that look sort of cornish if you fiddle with them.  Ten packs of 15 pine stems was just over ten bucks with shipping. 

12mm pine stems from This and That 4 Crafts.  They were cheap, and the size was about right.  Also available in 20mm (refers to circumference) which seemed too large.  There would be lots of trimming. 
Litko bases and trimmed pine stem ready to go.  40mm worked for me.  That's the width of two individually mounted figures or one Regimental Fire and Fury base.
 Step one was to coat the bases with something that looked as a ground cover.  For the most part, the bases are going to be covered by the corn, so I'm mostly just after a quick cover with something that could be mistaken for earth.  I used Liquitex modeling paste because it's acrylic, dries fast, and can actually be mixed with paint in my little water cup, and easily applied to the base with a paint knife.  Because it's acrylic, I also believed it wouldn't shatter when I drilled holes in it, and I was afraid that wood putty would just disintegrate in chunks.  Can't have that. Liquitex products are available at Michaels and JoAnn fabrics.  Use their weekly coupons to cut the $12.99 bucket of modeling goo to a more reasonable cost.


I've used Liquitex modeling paste as basing material in the past.  It's easy to work with, dries fast, but isn't particularly cheap. However, I thought it was the best material for this project.
  Step two-I waited for the modeling paste to dry completely, and while I was doing so I began cutting the pine stems into lengths.  The stems have wound metal wire cores, but cut easily with hobby sized diagonal cutters.  I cut mine into 1 1/2 inch lengths.  It's best to remove some of the "corn" at the very base of your plant so the wire is completely exposed.  The stems get pressed pretty flat in storage and shipping, so it's best to twirl them in your fingers a bit and ruffle the corn, or your corn stalks will look pretty two dimensional. When you finally get around to gluing them in, you'll find some lengths are longer than other.  That's okay, not all corn stalks are equal in nature's plan. 
My first base ready to receive corn stalks. 
Step three, drill holes in your Litko bases.  I use a Dremel tool for drilling, with wee small bits, though finding the right size hole for the fairly significant sized stem wires was a trial.  I drilled nine holes in three rows and hoped the corn would literally fill the base. You might be able to do twelve stems to a base, but it would be awfully crowded.

Voila, a close up of corn fields.  There's more I could do if I wanted.  Paint some of the leaves yellow to look like corn ears, or finish the base edges with Woodland Scenics material.  I haven't decided. 

Step four, finally, glue your pine stems into the holes.  I make sure to remove some of the very bottom leaves to expose the wire and put a tiny drop of CA glue in the hole.  It usually sets up right away and you can move along.

I finished six squares of corn in a couple of hours of not very intense work.  I hope to have about forty squares or so which takes up a LOT of space on the board. This is the first of my terrain projects for Chickasaw Bluffs.

Wednesday, December 21, 2011

Cubbies!!

I finished up the '84 Cubs this week, just in time for our gift exchange tonight.  Again, these are the Reviresco baseball players.  I've written about them before.  I chose this team and this uniform, because I knew Tim would like them.  He's a Cubs fan, and this is the team that started him down that road I think. 
Cubbies from the front

Cubbies from the back.
 This uniform offered some challenges.  The figures come with a traditional button down uniform, some with very bloused pants and shirts, other with a very straight appearance.  Unfortunately you have to have a minimum number of players to play the game, so everyone needs to look pretty much the same. I painted over the button down detail and really tried to paint in detail needed to make the team look unique.  The Chicago logo on the front and the cub insignia on the sleeve took some doing.  I also painted in the numbers and names on the back.  They should be in red, but I just couldn't get them to stand out very well.  This is my first attempt at painting in the names.  I was only sort of successful.  Bowa was a lot easier to paint in than Sandberg because there's only so much room on the figure. Oh, well. 

Thursday, December 15, 2011

On my painting table: gunners, ballplayers and Cavalcade Miniatures

Sometimes it's just hard to post.  It's not that I'm doing nothing, it's that my whole world is in process.

I've actually been painting my little (I wish) butt off.  Last weekend I finished painting up all those nice U.S. and Spanish artillerymen I wrote about.  They're finished, but the basing isn't done.  Not on all those silly American infantry either.  Why?
In the foreground are the Perry gunners.  Very nice, uncluttered figs.  In the back are the RSM Spanish artillerymen.  I'll get a final photo out when they are properly based.
Well it's the Christmas season dontcha know.  This year I've foolishly decided to paint some figures for two of my non-painting friends.  So as we hurtle toward next weeks's X-mas deadline I have to knock out twenty three 28mm figures. It's a lot but I'm making pretty good progress.

First on the list is 15 baseball players.  They are the last of my Reviresco baseball stash, and I wanted to paint them for my friend who is a big baseball fan.  He's equally divided between the Yankees of the Bronx Zoo era and those 80's Cubbies.  I decided to paint them up as the '84 Cubs that won the NL East title because I am an inveterate Yankees hater.  There was something very working class about that Cubs team, and I painted them up in their blue away pullovers.  There are some fiddly details on them that give the uniforms some character.  Should be finished with them tonight.
Tim's '84 Cubs from Reviresco.  The figs are pretty simple, and most of the detail has to be painted in.  Even so, every team I've painted has been fun. 
The other gift I'm painting is a batch of figures from Cavalcade Miniatures.  I first saw Cavalcade's French and Indian War figures on The Miniatures Page, and decided I needed an excuse to at least paint some.  I ordered a box each of the Rogers Rangers and French Marine figures.  The miniatures are all in serious winter dress and are wearing snowshoes.  The figures are quite nice with lots of detail  The muskets, in particular, are quite delicate and look very nice.  They are large and bulky in their heavy winter clothing, but anatomically consistent.  If I have a complaint it is that on a few figures the mold mark runs right down the miniatures' faces.  Though the flash is minor, on a couple of figures, removing this adequately was difficult.  They'll remain in queue behind the Cubs probably until Friday night.
In the queue are these Cavalcade French and Indian War figures on snowshoes.
The holiday vacation begins at 2:40 tomorrow.  You best believe I'll be blowing out on time and headed home to my painting table.  I have big painting plans for the break, and I'm hoping to get a lot done.

Tuesday, December 06, 2011

A Little of This and a Little of That

I wish I had something sexy to share like the hussars, but frankly things are going to be kind of uniform and boring for a bit.  I have painted, but not based, 18 American regulars for the project.  They were mostly figures I'd stripped and repainted.  The process was sloppy, and despite plenty of effort, I just didn't get all the gunk off from the previous paint and primer.  Thought I did . . .
OG Wayne's Legion figures.  They're awaiting basing-hopefully this weekend.  They actually look better than this-geez I hope so.

I also painted up my very last handful of usable Front Rank militia types, mostly command figures, and combined them with a couple of the Lewis and Clark figs to use with the militia masses I'll be calling into service at Chickasaw Bluffs.  I have an odd mix of figures to use for militia.  Lots of them are AWI figures from Front Rank and OG.  However, a fair number of them are from the Mountain Man range by Foundry.  I got them much cheaper than their present price, and they add some spice to volunteers out to chase off Indians and drive the Spanish of out of N'awleens. I need at least 80 figures in eight units for my planned scenario, and each unit needs command figures.  So I used the generic militia flags from Quindia studios to give them a bit of unit identification.  The flags turned out well-I really like them. Thanks Clarence.
A chance to show off my Quindia flags with my militia units.  I'll need about 80 militia figures in all for Chickasaw bluffs.
On my table right now is a bunch of artillery.  One of my purchases for this project were guns and gunners by the Perry brothers from their AWI range.  I've mostly painted the guns, and I've got to say I'm disappointed.  I've bought other guns from the same range, the six-pounders and crews for the Brits and the Americans and these were just lousy castings.  The gunners look great, but the guns look like the molds need cleaning.  These are the only disappointing miniatures I've had from them.  Just a simple Vallejo blue gray with a little gray dry-brushing before painting in the black hardware, Vallejo brass for the barrels, and then a follow up dry-brushing.  The odd gun is a Front Rank piece.  Not uniform with anything, I thought it might work as a militia-served piece.
Spanish guns in natural wood and American guns in blue-gray.  You can see the Perry gun carriage on the left is actually twisted.  Disappointing.
The other guns are from the RSM range now produced by Dayton Painting Consortium.  I can't say enough good things about these miniatures or DPC.  They were extremely easy to work with-great communicators for a small operation.  I'm really happy with the figures.  They have plenty of detail and love the elevating with the level figures.  My only beef is the figures,which came as a bagged set, create only three man crews, rather than the conventional four man crews.  I'll have to figure something out.
The RSM gunners by Dayton Painting Consortium are nice.  Not quite Perry nice, but cheaper and serviceable.
The guns, also RSM from DPC, are also nice.  The little three pounders are perfectly serviceable.  The twelve-pounders, while nicely detailed, seem undersized.  I can seem them as eight pounders, but the carriages and barrels should be larger.

More pictures when everything is done.